Telecom News,Mobile Solutions and more...
[Solved] Computer Won't Start... Keeps Beeping
11/04/2013 10:17:00 am
Computers are electronics devices and when one of the its components starts malfunctioning, the computer stops working too. It can be very hard to identify what's the problem is but say thanks to that beep sound which tells us exactly what is the reason of this. One of our computer stopped working last night. It was not starting at all and was continuously producing the beep sound. The fans were running, power cables were all good. Finally after 10-15 minutes we were able to figure out the problem. If you are facing the same problem then read on...
1. Start the computer and listen carefully to the beep.
2. Count the number beeps. Actually the beep can tell us a lot of things and the actual cause of the problem. If the number of beeps is 2 then it means a different thing. If it is 3 then it means a different thing:
3. Before removing anything, get a blower and clean your whole computer. Most of the times the real reason of this problem is the dust particles. Almost 90% of the times, after cleaning the computer, it starts working normally.
4. If even after removing the dust the problem still persists then start removing the video card, ram one by one and see what the problem is. If after removing a specific part it starts working properly then simply replace the faulty part.
1. Start the computer and listen carefully to the beep.
2. Count the number beeps. Actually the beep can tell us a lot of things and the actual cause of the problem. If the number of beeps is 2 then it means a different thing. If it is 3 then it means a different thing:
1 beep = Video card problem
2-3 beep = Ram problem
Continuous beep = Processor Problem
3. Before removing anything, get a blower and clean your whole computer. Most of the times the real reason of this problem is the dust particles. Almost 90% of the times, after cleaning the computer, it starts working normally.
4. If even after removing the dust the problem still persists then start removing the video card, ram one by one and see what the problem is. If after removing a specific part it starts working properly then simply replace the faulty part.
[Solved] How To Remove Runouce.exe Completely
10/06/2013 01:35:00 pm
Runouce.exe is the worst virus I have ever seen in my entire life. It affected me 3 days back when my brother downloaded some random thing from the internet which was packed by this virus "runounce.exe". It can block your internet connection, stop you from accessing anti-virus or anti-malware websites. Even if you try to install anti-virus software, it will not let it happen because it can understand and read names of the executables. I re-installed the Windows 3 times and and all of the times it returned. Luckilly I found a way to get rid of this virus and I will show how you can too.
Before starting let me summarize what "runounce.exe" can do:
In my case, along with runouce.exe there were two more viruses "net.exe" and "net1.exe". I think they are a part of the virus pack. After infecting the victim's computer, it make changes in the system reigstry and courrupts it. The 2nd thing it do is to spread in the system volume information of all the local disks you have on your system. So if you just format the C drive and re-install the Windows, runouce.exe will come again from other local drives.
Now I think you know how severe the condition is actually. Follow the steps given below to totally remove the runouce.exe from your system:
1. You will need another computer or laptop. Open up your 2nd computer or laptop and download "Malwarebytes Antimalware". Then rename the Malwarebytes software to something else to make sure that the virus doesn't identifies it. Now copy it into a flash drive.
2. Start the infected computer and press F8 during the bootup. This will take you into a menu. Then select the "Safe mode".
3. Once you are logged in as an aministrator in safe mode, connect the USB flash drive. Now install the Malwarebytes.
4. Once it has been installed, run it and make a quick scan of all the local disk drives and especially use the "Flash scan".
5. Then scan the USB too as it will also contain the viruses because you connected it.
6. Once the whole computer is scanned and cleaned, log out of safe mode and start computer normally.
7. Go and download "AVG 2014". Once downloaded, disable the Malwarebytes and isntall the AVG 2014 antivirus. After the installation is complete, run it and scan the whole computer again including the flash drive.
8. Once you are confident that it has scanned the whole computer, you will have install a fresh copy ofWindows. The reason I am saying to re-install the Windows is that this virus has the ability to replace the orignal windows files with the infected files.
One thing to remeber here is to always install a fresh copy. Repair Windows option will not provide good results. So format the C drive or where you have installed the windows and install a fresh copy.
Congrats. Your computer is now clean from runouce.exe and other viruses. For future, always make sure you have a good antivurs present on your system such as AVG 2014.
Before starting let me summarize what "runounce.exe" can do:
- It can block your internet connection.
- It can block your access to anti-virus websites.
- It will not allow you to install anti-virus softwares.
- It can spread in your whole computer and even replace your original windows files thus corrupting the operating system.
- It uses your internet conenction to send email spam.
In my case, along with runouce.exe there were two more viruses "net.exe" and "net1.exe". I think they are a part of the virus pack. After infecting the victim's computer, it make changes in the system reigstry and courrupts it. The 2nd thing it do is to spread in the system volume information of all the local disks you have on your system. So if you just format the C drive and re-install the Windows, runouce.exe will come again from other local drives.
Now I think you know how severe the condition is actually. Follow the steps given below to totally remove the runouce.exe from your system:
1. You will need another computer or laptop. Open up your 2nd computer or laptop and download "Malwarebytes Antimalware". Then rename the Malwarebytes software to something else to make sure that the virus doesn't identifies it. Now copy it into a flash drive.
2. Start the infected computer and press F8 during the bootup. This will take you into a menu. Then select the "Safe mode".
3. Once you are logged in as an aministrator in safe mode, connect the USB flash drive. Now install the Malwarebytes.
4. Once it has been installed, run it and make a quick scan of all the local disk drives and especially use the "Flash scan".
5. Then scan the USB too as it will also contain the viruses because you connected it.
6. Once the whole computer is scanned and cleaned, log out of safe mode and start computer normally.
7. Go and download "AVG 2014". Once downloaded, disable the Malwarebytes and isntall the AVG 2014 antivirus. After the installation is complete, run it and scan the whole computer again including the flash drive.
8. Once you are confident that it has scanned the whole computer, you will have install a fresh copy ofWindows. The reason I am saying to re-install the Windows is that this virus has the ability to replace the orignal windows files with the infected files.
One thing to remeber here is to always install a fresh copy. Repair Windows option will not provide good results. So format the C drive or where you have installed the windows and install a fresh copy.
Congrats. Your computer is now clean from runouce.exe and other viruses. For future, always make sure you have a good antivurs present on your system such as AVG 2014.
[Solved] IDM Integration Extension Flagged by Google Chrome
7/25/2013 07:44:00 am
A latest development has occurred at the Google end. Famous software "Internet Download Manager" which is used by millions of users worldwide has stopped working with Google Chrome. The problem is not at the Tonec Inc. end. Google Chrome has falsely identified IDM integration as a malicious extension. This has annoyed a lot of users and they have decided to revert back to Firefox or Opera browser.
Google Chrome has totally blocked this extension and users cannot install it at all. Google has also removed this extension even for those, who installed it some times ago. Luckily there is a solution to fix this problem.
Follow the steps given below to install IDM Integration extension in Google Chrome:
Step 1:
Click on Menu > Settings.

Scroll down and click on "Show Advanced Settings". Then find the "privacy" and uncheck "Enable phishing and malware protection".

Now close the Google Chrome.
Step 2:
Go to Internet Download Manager installation directory C:\Program Files\Internet Download Manager. Now find the file "IDMGCExt.crx". Now open the Google Chrome and go to extensions page. Now drag and drop the IDMGCExt.crx into Extensions page.

Now complete the installation. You need to enable "Allow in Incognito" checkbox.
Step 3:
Now go back to Menu > Settings > Show Advanced Settings and check the box "Enable phishing and malware protection".This step is important to protect your computer from malware and phishing attacks. [Skip this step].
Now please download something from Google Chrome to check if the extension is working properly or not.
Google Chrome has totally blocked this extension and users cannot install it at all. Google has also removed this extension even for those, who installed it some times ago. Luckily there is a solution to fix this problem.
Follow the steps given below to install IDM Integration extension in Google Chrome:
Step 1:
Click on Menu > Settings.
Scroll down and click on "Show Advanced Settings". Then find the "privacy" and uncheck "Enable phishing and malware protection".
Now close the Google Chrome.
Step 2:
Go to Internet Download Manager installation directory C:\Program Files\Internet Download Manager. Now find the file "IDMGCExt.crx". Now open the Google Chrome and go to extensions page. Now drag and drop the IDMGCExt.crx into Extensions page.
Now complete the installation. You need to enable "Allow in Incognito" checkbox.
Step 3:
Now go back to Menu > Settings > Show Advanced Settings and check the box "Enable phishing and malware protection".
Now please download something from Google Chrome to check if the extension is working properly or not.
How to Change Wi-Fi Password of PTCL ADSL Modem
7/09/2013 06:55:00 pm
Finally your neighbourhood tech savvy kid has hacked your password or you just simply want to change the password of your Wi-Fi then do not worry because I have created a full tutorial for you on how you can change your Wi-Fi password of PTCL ADSL modem. Follow the steps given below to change the password easily.
Step 1:
First make sure you are connected to the internet. Then open up your browser.
Step 2:
Type 192.168.1.1 in the address bar and press enter. You will be asked to enter "User name" and "password".

By default both the username and password is "admin". Enter admin for both username and password and click on login. If you have changed the username and password then enter it. In case if you have forgot the username and password, then call the customer support and request them to change the username and password to default values.
Step 3:
Once logged in, click on Wireless > Security present in the sidebar.

Step 4:
Change the password to anything you want. Remember to use a secure password to make sure it doesn't get hacked or stolen in near future. A combination of upper-case, lower-case letters and numbers is the ideal formula of a secure password. Once you have set the password, click on apply/save button. Also save it on a notepad or somewhere safe for future safe.
Step 1:
First make sure you are connected to the internet. Then open up your browser.
Step 2:
Type 192.168.1.1 in the address bar and press enter. You will be asked to enter "User name" and "password".
By default both the username and password is "admin". Enter admin for both username and password and click on login. If you have changed the username and password then enter it. In case if you have forgot the username and password, then call the customer support and request them to change the username and password to default values.
Step 3:
Once logged in, click on Wireless > Security present in the sidebar.
Then scroll down to the bottom and look for WPA/WAPI passphrase. This is the password of the Wi-Fi.
Step 4:
Change the password to anything you want. Remember to use a secure password to make sure it doesn't get hacked or stolen in near future. A combination of upper-case, lower-case letters and numbers is the ideal formula of a secure password. Once you have set the password, click on apply/save button. Also save it on a notepad or somewhere safe for future safe.
ProPakistani Hacked - Contains Links to Payday Loans Site
7/04/2013 05:45:00 pm
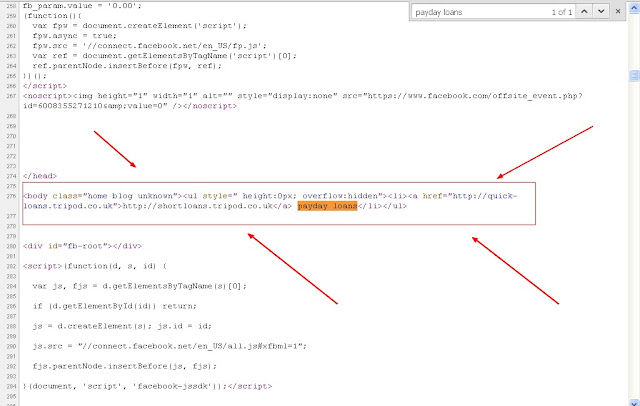
ProPakistani.PK is the leading website in Pakistan which covers the Pakistani telecom sector and IT news. It is quite popular in Pakistan where it has gained an Alexa rank of 153. Today I noticed a weird thing on their website when I opened their website on my mobile phone. I found a link to quick-loans.tripod.co.uk in their header but if you open it on your computer, it is not shown. On further investigation I found that the link was hidden using the following code:
On opening the website nothing shows up:

But when I looked at the source code of the website, I found a link to Payday loans website:
Now there are only two possibilities of this:
A) The site is hacked.
B) Aamir Attaa (owner) is selling links on his site.
I think the option A will be true. There is a lot of heat going on with the spammy Payday loans showing up in the SERPs having links from hacked sites. Google also shows a notification in the Webmaster tools if it detects any unnatural links on a site. Probably Aamir Attaa is unaware of this situation.
You can also see the hidden link by going to view-source:http://propakistani.pk/. Then search for payday loans to see the hidden link.
If Aamir Attaa is reading this, then I strongly recommend him to remove the links ASAP.
<body class="home blog unknown"><ul style=" height:0px; overflow:hidden"><li><a href="http://quick-loans.tripod.co.uk">http://shortloans.tripod.co.uk</a> payday loans</li></ul>
On opening the website nothing shows up:

But when I looked at the source code of the website, I found a link to Payday loans website:
Now there are only two possibilities of this:
A) The site is hacked.
B) Aamir Attaa (owner) is selling links on his site.
I think the option A will be true. There is a lot of heat going on with the spammy Payday loans showing up in the SERPs having links from hacked sites. Google also shows a notification in the Webmaster tools if it detects any unnatural links on a site. Probably Aamir Attaa is unaware of this situation.
You can also see the hidden link by going to view-source:http://propakistani.pk/. Then search for payday loans to see the hidden link.
If Aamir Attaa is reading this, then I strongly recommend him to remove the links ASAP.
Best Solution to Disable Copy/Paste & Right Click on Website
6/03/2013 05:48:00 pm
There are a lot of JavaScript available to disable the right click and text selection on webpage but all of them lack the proper functions and almost all of them shows a annoying message when a user clicks on right mouse button like "Right click disabled' or "Copy/paste disabled".
I also faced a similar situation and after searching on Google, I found that there was no script that matches my requirements. So I have created a simple but very effective JavaScript that will disable the copying of text, images and right mouse button. This JavaScript will also disable the commands like Ctrl+C and Ctrl+V. The text will be replaced by your url if some one will try to copy the content from your site.
This is the code:
You can use this on any website that supports JavaScript including WordPress, blogger blogs and so on.
How to use this:
For blogger blogs, go to Layout> Add a gadget> HTML/JavaScript and paste the code shown above. Click on save.
Some of the unique features of this Javascript are:
Let me know what you think of this JavaScript.
I also faced a similar situation and after searching on Google, I found that there was no script that matches my requirements. So I have created a simple but very effective JavaScript that will disable the copying of text, images and right mouse button. This JavaScript will also disable the commands like Ctrl+C and Ctrl+V. The text will be replaced by your url if some one will try to copy the content from your site.
This is the code:
<script type="text/javascript">function mousedwn(e) { try { if (event.button == 2||event.button == 3) return false; } catch (e) { if (e.which == 3) return false; }
} document.oncontextmenu = function() { return false; } document.ondragstart = function() { return false; } document.onmousedown = mousedwn; </script>
<script language="JavaScript" type="text/javascript">if (top.location != self.location) top.location.replace(self.location);</script>
<meta http-equiv="imagetoolbar" content="no">
<script type="text/javascript">document.ondragstart = function(){return false;};</script>
<style type="text/css">*:not(input,textarea) {
-webkit-touch-callout: none; -webkit-user-select: none;}
img { -webkit-touch-callout: none; -webkit-user-select: none; } </style>
<script type='text/javascript'>window.addEventListener("keydown",function (e) { if (e.ctrlKey && (e.which == 65 || e.which == 67 || e.which == 85 || e.which == 80)) { e.preventDefault(); }}) document.keypress = function(e) { if (e.ctrlKey && (e.which == 65 || e.which == 67 || e.which == 85 || e.which == 80)) { } return false; };</script>
You can use this on any website that supports JavaScript including WordPress, blogger blogs and so on.
How to use this:
For blogger blogs, go to Layout> Add a gadget> HTML/JavaScript and paste the code shown above. Click on save.
Some of the unique features of this Javascript are:
- Disable right click on your site without showing annoying message.
- Disable copying of images.
- Prevents your users from using the commands like Ctrl+C and Ctrl+V.
- Very fast and easy to use
Let me know what you think of this JavaScript.
How to Remove Default Tab Extension in Google Chrome
5/25/2013 11:38:00 am
Default Tab extension is actually a browser hijacker extension and it usually comes along with free games or other products. After its installation, when you open the Google Chrome next time, a new default tab opens up with a search function instead of showing a blank page or the page you have set as homepage.

I also faced a similar situation when my brother installed a free game and this browser hijacker was packed with the game. After its installation, it changed the default tab in Google Chrome to a website with search option. I tried removing this extension by going to wrench menu > Extensions > Default tab but it showed up again next time. I tried deleting it from Add/Remove Programs but it comes again. Luckily I found a way to get rid of Default Tab extension.
Follow the steps given below to remove Default tab:
Step 1: Go to wrench icon > Extensions and remove the default tab extension.
Step 2: Close the Google Chrome.
Step 3: Go to Add/Remove programs and uninstall the Default tab.
Step 4: Open the Task Manager and kill the process "Default tab". The name of the process will be similar to default tab.
Step 5: Go to C:\Program Files and delete the folder "Default Tab".
Now open the Google Chrome and you will see that the Default tab extensions is gone now. Now run a virus scan to make sure that there are no other viruses on your computer.
Check Your Polling Station Details By Sending SMS
5/11/2013 05:49:00 am
If you are still wondering where you are supposed to go and cast your vote and do not know your polling station then do not worry because you cane easily find out the details of your designated polling station by sending out a SMS.
Here is the procedure to check out your polling station:
 The reply will be in the Urdu language. The "silsila number" is the serial number. More than 40 million people have already availed this service. Do not waste time and check out your polling station now if you want to to cast your vote.
You can send multiple SMS to 8300 to find the polling station of all of your family members.
Here is the procedure to check out your polling station:
- Create a new SMS
- Enter your CNIC with dashes
- Send the SMS to 8300
You can send multiple SMS to 8300 to find the polling station of all of your family members.
Payoneer Global Bank Transfers now Available in Pakistan
5/04/2013 04:19:00 pm
Payoneer has just announced a new update via their blog that Pakistani Rupees is now added to list of supported currencies for Global Bank Transfer services. Recently they added Kenyan shillings and now PKR!
The service will not be so expensive as it only costs $2.99 per payment and users can receive their payments from the Payoneer partners in Pakistani Rupee instead of US Dollar ($). Payoneer is providing a number of services like US payment service (Direct deposit), card to card payment, Global Bank Transfer, receiving funds directly on your card etc.
If you are already using the Payoneer Global Bank Transfer service and want to recieve funds in PKR instead of US Dollar, then contact the Payoneer service department at
lbt@payoneer.com.
Boost Your Download Speed with Internet Turbo 2013
4/26/2013 07:45:00 am
Internet Turbo 2013 is a revolutionary software which optimizes and speed up all your internet activities like downloading, uploading etc. Internet Turbo has become a threat for its competitors because it is totally free to use and way better than those paid software.
Some of the features of this amazing software are:
Save your Time:
Are you tired of your slow internet connection and looking for a way to speed things up...then Internet Turbo is your solution. With its amazing built-in technology, Internet Turbo speeds up your online activities like web browsing, downloading, uploading, video streaming, sharing and more.
Save your Money:
Yes you have heard right. This software is totally free to use. Now there is no need to waste your money on those stupid software.
Stay Connected:
Internet Turbo includes a function "forever connected" which prevents your internet connection from being disconnected by your ISP. Most of the ISPs have some sort of fixed time period after which you will be automatically disconnected. Internet Turbo prevents those unwanted disconnections.

Download:
Click Here to download "Internet Turbo 2013" totally free.
Some of the features of this amazing software are:
Save your Time:
Are you tired of your slow internet connection and looking for a way to speed things up...then Internet Turbo is your solution. With its amazing built-in technology, Internet Turbo speeds up your online activities like web browsing, downloading, uploading, video streaming, sharing and more.
Save your Money:
Yes you have heard right. This software is totally free to use. Now there is no need to waste your money on those stupid software.
Stay Connected:
Internet Turbo includes a function "forever connected" which prevents your internet connection from being disconnected by your ISP. Most of the ISPs have some sort of fixed time period after which you will be automatically disconnected. Internet Turbo prevents those unwanted disconnections.
Comparison between Internet Turbo and Others
Click Here to download "Internet Turbo 2013" totally free.
PTCL Now Offering 100Mbps Broadband Connection
4/22/2013 03:54:00 pm
PTCL is now offering high speed broadband internet services over FTTH in limited areas of Lahore, Islamabad and Karachi. We have found this news in a marketing brochure being distributed by PTCL employees in select areas. According to it, the price of 100Mbps Broadband Connection will be Rs 25,999.
Have a look at the marketing brochure:

Initially it will be launched in Sector F-11 of Islamabad (limited connections) which indicates that it will be their testing hub. This service is still in the beta testing mode and is not launched on full scale.
The prices of the high speed internet will be:
Have a look at the marketing brochure:
Initially it will be launched in Sector F-11 of Islamabad (limited connections) which indicates that it will be their testing hub. This service is still in the beta testing mode and is not launched on full scale.
The prices of the high speed internet will be:
- 4 Mbps - Rs 2,999
- 6 Mbps - Rs 5,999
- 8 Mbps - Rs 7,999
- 10 Mbps - Rs 10,999
- 50 Mbps - Rs 15,999
- 100 Mbps - Rs 25,999
Free Calls from Zong to Zong For 1 Week
4/14/2013 10:10:00 am
Zong has introduced a new offer for those customers who have bought new Zong Sim or have recently teleported their sim to Zong network. All such customers will enjoy free calls for 1 Week (7 days).
 The free calls offer will only be valid for on-net calls means Zong to Zong. So if you are a new customer or planing to change your network to zong, then it is a good chance for you to do it now and avail this amazing offer.
Mobile operators keeps offering new incentives to attract new customers and this offer is a fine example of this. Other networks also offers such incentives from time to time. This kind of marketing has been proven to be very effective.
How to activate: For activation dial *767#.
How to Change your Network: If you want to change your network to Zong to avail this offer, then dial 0314-3334455 from your mobile phone.
Terms and Conditions:
- Free calls will be only for on-net numbers.
- This offer is only for new customers.
- This offer is valid until 30 April 2013.
- Free calls will be from 6 A.M. to 6 P.M.
Protest Against Load Shedding in Lahore
4/08/2013 05:57:00 pm
Looks like load shedding has returned and this time with more intensity. With the rise in temperature, the duration of unscheduled load-shedding has been increasing day by day and even the locals of the city Lahore are facing up to 17-20 hours of power outages. At the time of writing this, there is no light in my area for more than 7 hours. Yesterday there was no electricity for more than 16 hours.
Have a look at the picture of a protest:

Our sources inside the Wapda are saying the electricity shortfall has reached 5000 mega watt. This sudden increase in load shedding has disturbed the normal routine work of the citizens. Similar situations are witnessed in all the major cities of Punjab.
With the increase in load shedding, the public protests have also been increased due to which Wapda has tightened its security near grid stations to protect them. A Wapda official has said to Cellular Pak reporter that the gas supply to Uch powerhouse has been restored and this condition will be improved in the coming days.
Have a look at the picture of a protest:
Our sources inside the Wapda are saying the electricity shortfall has reached 5000 mega watt. This sudden increase in load shedding has disturbed the normal routine work of the citizens. Similar situations are witnessed in all the major cities of Punjab.
With the increase in load shedding, the public protests have also been increased due to which Wapda has tightened its security near grid stations to protect them. A Wapda official has said to Cellular Pak reporter that the gas supply to Uch powerhouse has been restored and this condition will be improved in the coming days.
Satellite Images Of Allama Iqbal Airport Lahore
4/02/2013 09:47:00 am
Allama Iqbal Airport is located in Lahore - Capital of province Punjab. The airport is an economic hub for the Lahore. The old airport was not equipped with the modern infrastructure due to which the whole building of the airport was rebuilt again keeping in view the modern airports of the world.
Have a look at the satellite image of the Allama Iqbal Airport:

The old building of Airport was not so big as compared to the current building. The old building is now used as camp for Pilgrims during the Hajj Season. Have a look at the old building for Airport:
 There are 5 terminals present in the Airport. So at a time up to 5 flights can be managed:
 The airport has its own Mosque where the workers and officers can offer prayer:
 The surroundings of the airport was empty in the beginning but now different housing schemes have been build around the airport. One of them is Askari X:
 The Airport remains open 24 hours a day, 7 days a week and 365 days of the year. Allama Iqbal Airport is an important part of the Lahore. There are several buildings under construction in the surroundings of the airport which will be future hotels and shopping malls.
The following picture shows Pace Shopping Mall under construction:
 A branch of Metro Cash & carry store is also present which serves as a quality store for the residents of Askari X and neighborhood areas.

I hope you will enjoy these satellite images of the airport.
Have a look at the satellite image of the Allama Iqbal Airport:
The old building of Airport was not so big as compared to the current building. The old building is now used as camp for Pilgrims during the Hajj Season. Have a look at the old building for Airport:
The following picture shows Pace Shopping Mall under construction:
I hope you will enjoy these satellite images of the airport.
Medialink Wireless N USB Adapter Review
3/31/2013 09:29:00 am
MediaLink is pioneer in offering the ultimate Wi-Fi solutions, Wireless USB adapters and related items. Their product "Wireless N USB adapter" has recently hit the #2 spot in the best sellers at the Amazon store which shows how much popular their products are.
Let's have a look at the MediaLink Wireless N USB Adapter (MWN-USB150N):
 The MWN-USB150N model ic fully compatible with the 802.11n (Draft 2.0), 802.11b and 802.11g standards. The adapter is capable of providing the full speed and coverage standards because of its state of the art technology and it is the best adapter available in the market. Maximum Wireless transmission rates is approximately 150Mbps. The device uses the latest MIMO technology, due to which it has two internal Intelligent Antennas capable of providing the ultimate wireless performance, transmission rates and stability. Built-in functions automatically avoid channel conflicts.
It is very easy to install the MWN-USB150N and even the most novice users can install the product easily. All you have to do is to insert the CD and click on install software. Then the utility will auto detect the device and you are ready to use. You don't need to worry about the compatibility issues because it is fully compatible with all brands of Wi-Fi routers.
Don't take the MediaLink Wireless adapter as just the ordinary adapters present in the market, it is certified by Microsoft to ensure the maximum compatiblity with the available operating systems such as Window 200, XP and Vista.
The adapter offers state of the art security encryption including 64/128/152-bit wep, WPAWPA2 and WPA-PSK/WPA2-PSK encryption.

You will get all these items with the product:
 Buy Now:
List Price:$65
Price: $14.99 only, you will save $51.
Buy: Click Here to buy the product from Amazon.
Let's have a look at the MediaLink Wireless N USB Adapter (MWN-USB150N):
It is very easy to install the MWN-USB150N and even the most novice users can install the product easily. All you have to do is to insert the CD and click on install software. Then the utility will auto detect the device and you are ready to use. You don't need to worry about the compatibility issues because it is fully compatible with all brands of Wi-Fi routers.
Don't take the MediaLink Wireless adapter as just the ordinary adapters present in the market, it is certified by Microsoft to ensure the maximum compatiblity with the available operating systems such as Window 200, XP and Vista.
The adapter offers state of the art security encryption including 64/128/152-bit wep, WPAWPA2 and WPA-PSK/WPA2-PSK encryption.
You will get all these items with the product:
List Price:
Price: $14.99 only, you will save $51.
Buy: Click Here to buy the product from Amazon.
How To Use NameCheap Domain On Blogger
3/28/2013 05:14:00 pm
Most of the people who has bought their first domain or even the tech guys are facing problems in using domains registered at NameCheap with blogger. There are already a lot of tutorials about this topic but all of them are incomplete and misses a lot of vital information. So today I have decided to write a simple tutorial on "How to use NamCheap domain with blogger?"
1. Go to your NameCheap account and view your domains:

2. Click on the domain you want to use with your blogger blog.
3. Click on All Hosts Record located in left sidebar:

4. For the Host name @ record enter your domain including htttp:// and set the record type as URL redirect. example: http://www.site.com/.
5. For the second Host name record www enter ghs.google.com. and set the record type as CNAME.
6. Create 4 new A records in the sub domain settings. In the Host name section enter your naked domain like site.com without www. In the IP address field enter these IP addresses:
216.239.32.21
216.239.34.21
216.239.36.21
216.239.38.21
and click on save. Have a look at the screenshot:
 Replace the http://www.site.com with your domain url. In the sub domain settings site.com will be replaced by your naked domain without http://www.
7. Click on save. Now wait for 10-20 minutes.
8. Now to go to your Blogger Dashboard and click on your blog settings.
9. Under Publishing, click on add a custom domain. Then click on switch to advanced settings and enter your full domain url like www.site.com. Remember that entering naked domain will return an error. Click on save.

10. After clicking on save you will be given a new CNAME record to verify your domain ownership. Now go to back to your NameCheap account and add a new CNAME record and enter the values given by blogger. The "*****.dv.googlehosted.com." will go to IP Address field and the second one in the Host Record.
11. Now go back to blogger settings and repeat the step 9.
12. That's it. Now you are done.
Now check if it is workin properly or not by opening your domain url. If it is showing any error then please note that it take 2-24 hours or even 2 days for the domain propagation to take place.
If you are facing any problems then comment below and I will try my best to solve them.
1. Go to your NameCheap account and view your domains:
3. Click on All Hosts Record located in left sidebar:
4. For the Host name @ record enter your domain including htttp:// and set the record type as URL redirect. example: http://www.site.com/.
5. For the second Host name record www enter ghs.google.com. and set the record type as CNAME.
6. Create 4 new A records in the sub domain settings. In the Host name section enter your naked domain like site.com without www. In the IP address field enter these IP addresses:
216.239.32.21
216.239.34.21
216.239.36.21
216.239.38.21
and click on save. Have a look at the screenshot:
7. Click on save. Now wait for 10-20 minutes.
8. Now to go to your Blogger Dashboard and click on your blog settings.
9. Under Publishing, click on add a custom domain. Then click on switch to advanced settings and enter your full domain url like www.site.com. Remember that entering naked domain will return an error. Click on save.
10. After clicking on save you will be given a new CNAME record to verify your domain ownership. Now go to back to your NameCheap account and add a new CNAME record and enter the values given by blogger. The "*****.dv.googlehosted.com." will go to IP Address field and the second one in the Host Record.
11. Now go back to blogger settings and repeat the step 9.
12. That's it. Now you are done.
Now check if it is workin properly or not by opening your domain url. If it is showing any error then please note that it take 2-24 hours or even 2 days for the domain propagation to take place.
If you are facing any problems then comment below and I will try my best to solve them.
Samsung Galaxy Grand I9082 Specifications
3/24/2013 11:40:00 am
Live the grand life with the new Samsung Galaxy Grand I9082. The mobile comes with 8 MP rear camera and 2 MP front camera for photo and video lovers. Samsung Galaxy Grand I9082 uses the latest android OS v4.1 (jelly bean) and its 5 inch huge display makes it a must have android phone.

Samsung Galaxy Grand I9082 Specs:
Have a look at the specifications of Galaxy Grand:
Price: $378 only
Click Here to buy it from Amazon.
Samsung Galaxy Grand I9082 Specs:
Have a look at the specifications of Galaxy Grand:
Dimension
|
143.4 x 76.9 x 9.6 mm
|
Approximately 10 hours talk time & 440 hours stand by
| |
Operating System
|
Android version 4.1.2 Jelly Bean
|
Memory
|
8 GB built-in memory, micro SD card supports up to 64 GB and 1 GB RAM
|
Processor
|
Dual Core @ 1.2 GHz
|
Weight
|
162 grams
|
Display
|
480 x 800 pixels and 5 inches HD display
|
Camera
|
8 MP back camera & 2 MP front cameras with LED flash, auto-focus, image stabilization. High definition video recording (1080p 30fps)
|
Colors
|
Black and white only
|
Connectivity
|
Bluetooth, GPRS, EDGE, 3G, WI-FI, USB and WLAN
|
Operating Frequency
|
SIM 1: 850 / 900 / 1800 / 1900 (HSDPA 850 / 900 / 1900 / 2100)
SIM 2: 850 / 900 / 1800 / 1900 (HSDPA 850 / 900 / 1900 / 2100)
|
Messaging
|
SMS, Email, MMS, Instant Messenger
|
Browser
|
HTML5
|
Price:
|
$378 approximately (price may vary with time)
|
Others
|
GPS, Dual SIM, Google voice, Google Maps, Speaker, Active noise cancellation, Skype and access to millions of apps.
|
Buy Now
|
Click Here to buy it from Amazon.
|
Price: $378 only
Click Here to buy it from Amazon.
PTCL Home Entertainment Upsized - Discount on SmartTV
3/23/2013 08:48:00 am
PTCL has announced a new promotional offer for its service SMARTTV for the special day 23rd March 2013. Order SmartTV today and get exclusive discounts for the next 2 years! Pakistan - Let the celibration begins !

The customers who will order for SmartTV today will only have to pay Rs 600 (monthly service fee) and monthly device installment fee Rs 600 for 2 years. Remember this offer is only valid for a limited only.
PTCL Smart TV Jadoo plus brings premium content to your television in high definition (HD). Get loads of hit movies, on demand TV shows, pause-rewind function, songs and a lot more.
Features of PTCL Smart TV:
Note:
- Device is also available on upfront payment of Rs 10,000.
- Terms and conditions apply.
- This offer is 23rd march special. (As seen on newspapers).
The customers who will order for SmartTV today will only have to pay Rs 600 (monthly service fee) and monthly device installment fee Rs 600 for 2 years. Remember this offer is only valid for a limited only.
PTCL Smart TV Jadoo plus brings premium content to your television in high definition (HD). Get loads of hit movies, on demand TV shows, pause-rewind function, songs and a lot more.
Features of PTCL Smart TV:
- Full HD 1080 pixel
- 2 USB slots for external data drive/Wi-Fi adapter
- HDMI compatible output support in addition to AV output
- user friendly electronic program guide
- 125 local + international channels
Note:
- Device is also available on upfront payment of Rs 10,000.
- Terms and conditions apply.
- This offer is 23rd march special. (As seen on newspapers).
How to use Custom Robot Header Tags in Blogger
3/10/2013 08:28:00 am
Blogger has been trying to make blogger blogs more SEO friendly and the introduction of Custom Robot Header tags is just a fine example of this. Now you don't need to add tags in the head section of your template manually because now you can do it by setting up the custom robot header tags.
Follow the steps given below:
1. Go to settings menu of your blog.
2. Select Search Preferences.
3. Scroll down and enable the Custom Robot Header tags by clicking on edit:

4. Click Yes for Enable custom robots header tags and click on Save Changes.
5. Use the settings given in screenshot:

By using noindex and noarchive for "Archive and Seach pages", all archive pages of your blog indexed in Google Search, will be removed which is better for SEO. having archive pages in Google can lead to Google Panda penalty due to duplicate content.
Remember to use this function carefully. If you do not know anything about these tags then just follow the screenshot given above exactly.
**This post is written by Guest Author who blogs at Secret Black Hat blog.**
Follow the steps given below:
1. Go to settings menu of your blog.
2. Select Search Preferences.
3. Scroll down and enable the Custom Robot Header tags by clicking on edit:
4. Click Yes for Enable custom robots header tags and click on Save Changes.
5. Use the settings given in screenshot:
By using noindex and noarchive for "Archive and Seach pages", all archive pages of your blog indexed in Google Search, will be removed which is better for SEO. having archive pages in Google can lead to Google Panda penalty due to duplicate content.
Remember to use this function carefully. If you do not know anything about these tags then just follow the screenshot given above exactly.
**This post is written by Guest Author who blogs at Secret Black Hat blog.**
How To Verify Payoneer US Payment Service
3/06/2013 05:37:00 pm
As all of you know that Payoneer’s US Payment Service is a premium service that allows users to receive direct deposit payments from select US companies directly to their Payoneer Prepaid Debit MasterCard® Card, using the ACH network.
 Remember that you can only receive direct deposits from select US companies also.
How To Verify Payoneer's US Payment Service:
Before using the US Payment service you will need to verify it by providing ID document. Follow the steps given below to verify your USP service:
1.Login to your Payoneer account.
2.Click on services > US Payment Service.Activate your service.
3.You will receive an email in your inbox with links to upload your ID document and a short questionnaire.
4.Follow the link to upload your ID documents. You can use your ID card or driving license. Don't worry if it is not in English. They only need government issued card.
5. Now follow the link to questionnaire. Here you will have to explain your source of income (i.e. where the money is coming from). Be specific and tell them from where and how you will receive the money. Identify the name of company from where you are expecting to receive money.
6. After 2-3 days you will receive another email saying "please send us a screenshot of your **** account profile". **** will be company you have listed in questionnaire. Provide them the screenshot.
7. It will only take 2-3 days for Payoneer staff to verify your USP service.
Note:
- Do not try to give fake information.
- Make sure that the scanned copy of ID document is clear and readable.
- The ID card number should be same to the one which you used while signup.
- Your request can be delayed if the next day is Saturday or Sunday. So be patient.
Subscribe to:
Comments
(
Atom
)

